What tools do you need for laminate flooring Installation?
What Tools do you need for Laminate flooring installation?
Laying laminate flooring is a relatively straightforward process, but it does require a set of specific tools to ensure a professional-looking finish. Here’s a detailed breakdown of the tools you’ll need:
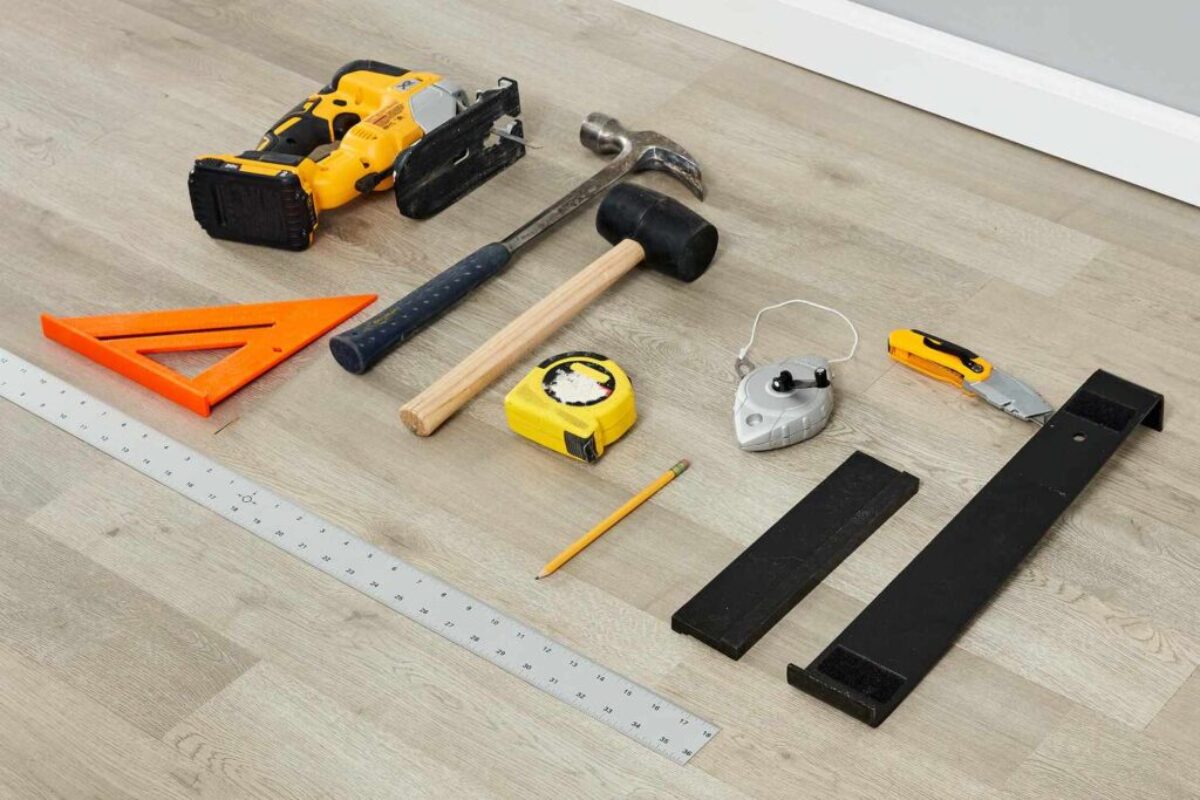
1. Measuring Tape
- Purpose: Used to measure the length and width of the room, as well as the dimensions of each laminate plank to ensure accurate cuts and fitting.
- Details: A 25-foot measuring tape is usually sufficient. It’s important to get accurate measurements for the space to calculate the amount of flooring needed and to make precise cuts around walls and obstacles.
2. Carpenter’s Pencil
- Purpose: Used for marking measurements on the laminate planks.
- Details: A carpenter’s pencil has a flat shape that prevents it from rolling away, and it’s easy to sharpen to a fine point for precise markings.
3. Utility Knife
- Purpose: Used for cutting underlayment and opening boxes of laminate flooring.
- Details: A sharp utility knife with a retractable blade is essential. It’s handy for detailed cutting, such as trimming underlayment and cleaning up edges.
4. Laminate Flooring Cutter or Circular Saw
- Purpose: Used for cutting the laminate planks to fit the room.
- Details: A laminate flooring cutter is a specialized tool that makes clean, straight cuts without much noise or dust. Alternatively, a circular saw can be used, though it may produce more dust and requires careful handling to ensure straight cuts.
5. Jigsaw
- Purpose: Used for cutting shapes into the laminate, such as notches or curves to fit around door frames, vents, or other obstacles.
- Details: A jigsaw with a fine-toothed blade is ideal for making detailed and curved cuts. It’s more versatile than a circular saw for intricate cuts.
6. Tapping Block
- Purpose: Used to tap the planks together without damaging the edges.
- Details: A tapping block is a small, durable block (usually made of plastic) that evenly distributes force when tapping laminate planks together, ensuring they lock tightly without chipping.
7. Pull Bar
- Purpose: Used to pull together laminate planks when space is tight, such as at the end of rows or near walls.
- Details: A pull bar has a hooked end that fits over the edge of the laminate plank, allowing you to gently pull the plank into place with a mallet.
8. Rubber Mallet
- Purpose: Used to gently tap the tapping block or pull bar to lock planks together.
- Details: A rubber mallet is preferred over a regular hammer because it won’t damage the laminate. It helps to apply controlled force without causing dents or chips.
9. Spacers
- Purpose: Used to maintain a consistent gap between the laminate planks and the walls.
- Details: Spacers are small pieces of plastic or wood placed between the flooring and the wall to allow for expansion. This gap prevents the floor from buckling when it expands and contracts with changes in temperature and humidity.
10. Level
- Purpose: Used to ensure the subfloor is even before laying down the laminate.
- Details: A level helps identify high or low spots on the floor, which may need to be sanded down or filled in to prevent the laminate from bowing or separating.
11. Flooring Underlayment
- Purpose: Provides a smooth surface for the laminate, reduces noise, and acts as a moisture barrier.
- Details: Underlayment is typically a thin foam or felt layer rolled out over the subfloor. It’s essential for cushioning the laminate and protecting it from moisture and imperfections in the subfloor.
12. Vacuum or Broom
- Purpose: Used to clean the subfloor before laying the underlayment and laminate.
- Details: Ensuring the subfloor is free of dust and debris is crucial for proper installation. A vacuum or broom helps keep the work area clean.
13. Hand Saw
- Purpose: Used for trimming door jambs and other small cuts.
- Details: A fine-toothed hand saw allows for precise cuts when trimming around obstacles, like door frames, where a power saw might be too large or unwieldy.
14. Clamps
- Purpose: Used to hold planks in place while cutting or during installation, especially when doing detailed work.
- Details: Clamps ensure the planks don’t shift while you’re working, providing more accuracy during installation.
15. Caulking Gun
- Purpose: Used to apply adhesive or silicone around the edges of the floor, especially in areas where water might be present, like kitchens and bathrooms.
- Details: A caulking gun helps apply a consistent bead of caulk to seal gaps and protect the floor from moisture.
16. Moisture Meter
- Purpose: Used to check the moisture content of the subfloor before installation.
- Details: A moisture meter is essential to ensure the subfloor is dry enough to avoid issues like mold or warping of the laminate over time.
Each of these tools plays a critical role in ensuring that your laminate flooring is installed correctly, looks good, and lasts for many years. Proper preparation and having the right tools will make the job easier and more efficient.


